DIY Menu and Table Place Setting Card
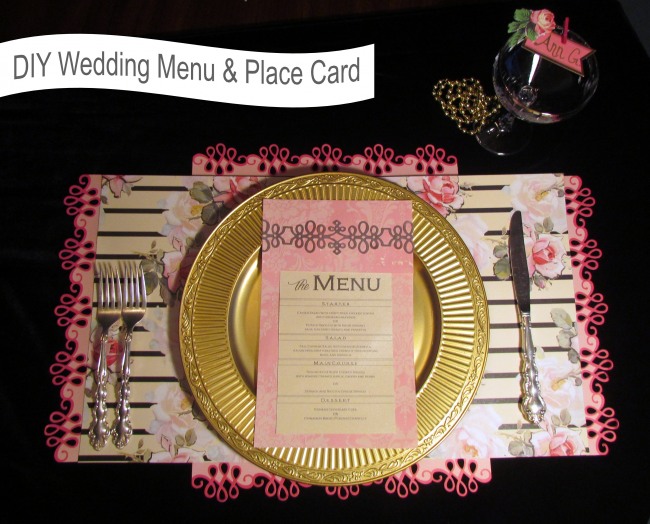
Have you ever thought of making your own DIY wedding menu? Or how about your own DIY place card setting? I did both!
After partnering up with Xyron and Anna Griffin, L&L was put to the challenge of making our own fabulous DIY menu and table place setting card! The trick to making these DIYs look so darn good is the amazing products that Anna Griffin and Xyron have to offer.
Here’s What You’ll Need:
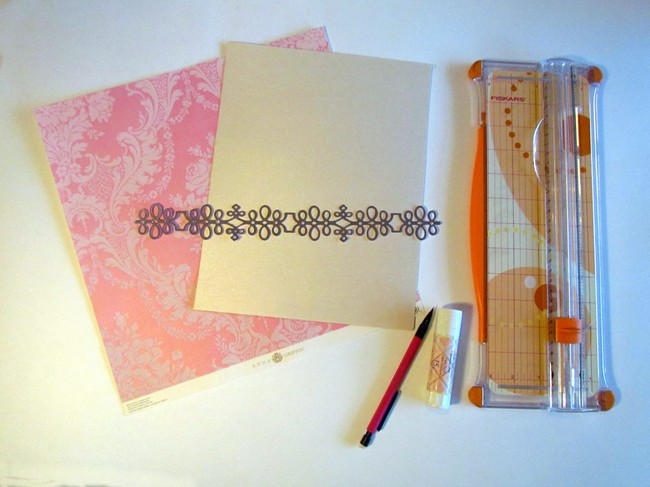
Stationery
- Soft Hues Metallic Paper Kit
- 3D Bouquet Border Stickers
- 60pc Flocked Papers
Extras
- Paper Cutter
- Printer
- Pencil
- Glue Stick
- Ruler
- 9” Creative Station Laminate by Xyron (Optional)
Instructions
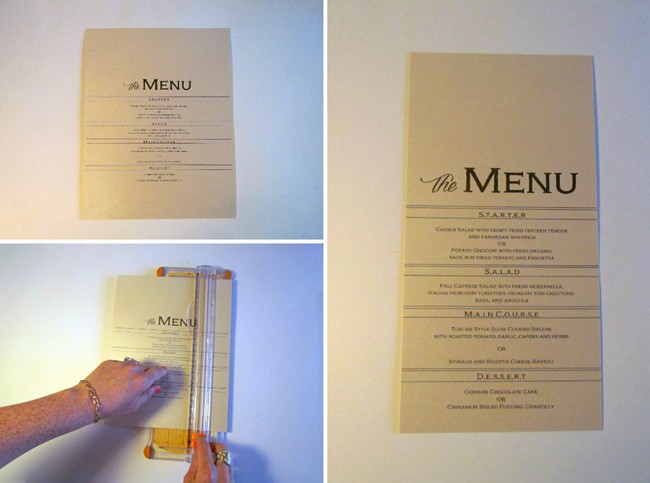
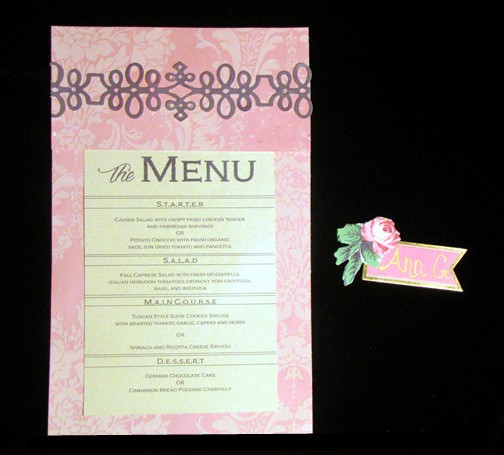
Step 1: Create and print out your own wedding menu, I used Microsoft Word. Print the menu on Anna Griffin’s Soft Hues Metallic Paper. I used the fonts Dragon is Coming and Adorn Copperplate. You can be as creative as you want with the layout of your menu.
Step 2: Use a paper cutter to cut the menu to the shape your think will look best. I wanted my menu to be long and skinny to show off the beautiful paper border.
Step 3: Next take your Anna Griffin Flocked Paper (feels like velvety goodness) and lineup your finished menu with the flocked paper. Use a pencil and a ruler to measure out: A) where you think the menu will look best, and B) how big of a border you would like to have around the finished menu. I wanted a larger border on top, so I measured a separate piece of flocked paper for the top of the finished menu.
Tip: Once you have figured out your border widths, use a ruler and take note of the measurements and sizes so that all of your menus will be uniform.
Step 4: Use your glue stick to glue all 3 sheets together.
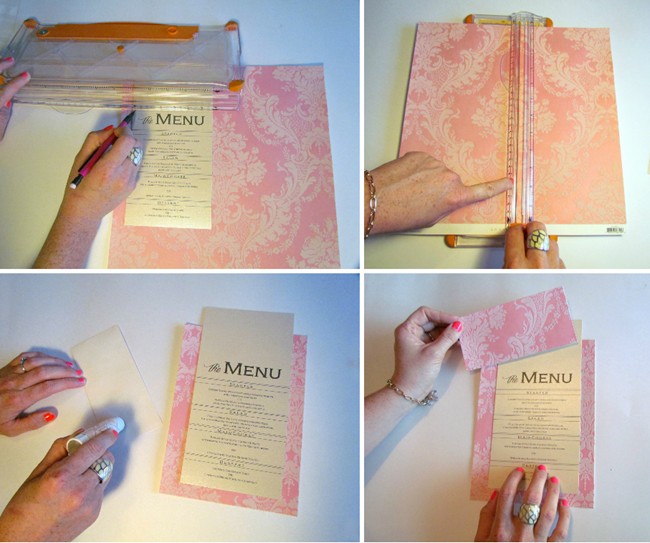
Step 5: Complete the menu by taking the Ann Griffin 3D Bouquet Border Stickers and place it on top.

Table Place Setting Card
Here’s What You’ll Need:
- Festive Flags
- 20th Anniversary Sticker Kit
- Mini colored clothes pegs
- Metallic Marker
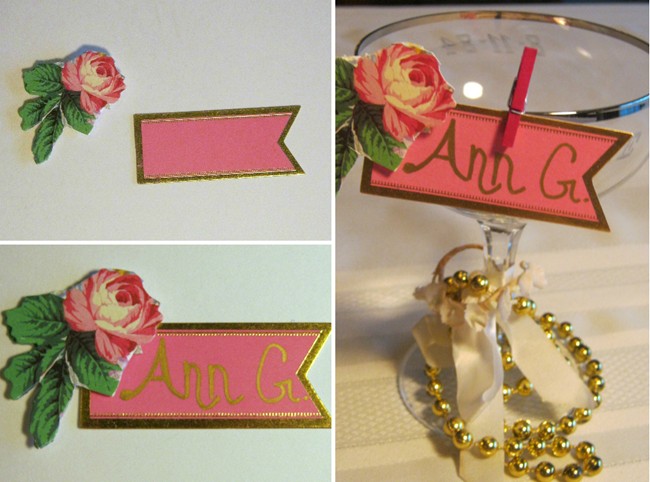
If you are making place card for your wedding, consider a project that is easy. When I saw the package of Ann Griffin Festive Flags I knew right away what I wanted to do with them. I first wrote my guest’s name on the festive flag with a gold metallic pen and then added a flower. Each flower has an adhesive sticker, so it was super easy to peel and stick. I had mini clothes pegs from another project, which can hold the guest’s name in place on their wine glass at the table.
Remember: when you are tackling DIY projects for your wedding start early and don’t make the project overly complex. If you have a lot of DIYs, the easier the project the better.

Meredith
Despite her dreamy wedding blogger lifestyle, Meredith's day job is running ClassicVeils.com and a full-time mom to an active toddler. If she could, Meredith would spend her days taking cruises, helping animals in need, and watching Big Brother!


Love the flocked paper. Very nice and detailed work!
I love the edge on the place mat. I like the light and dark pink used, it made everything outstanding. The rose was beautiful along with everything else.
I love the edge on the place mat and using the light and dark pinks was outstanding. The rose was beautiful along with everything else.
wonderful job, this is so elegant and beautiful.
Pretty colors, love the wine glass idea, so adorable! Good luck!
Absolutely love your designs. Detailed but simple. Elegant.
These designs are elegant and some of them simple to assemble, I choose the rose design on the menu and place card. The rose just says Love to me.
Lovely projects. Good luck with the contest and thanks for the chance to also win some great products.
A rose just resonates love ,and the placemats and menu is elegant but simpler to replicate.Love all the ideas, was hard to choose.
I think my reply was cut off, I hope you get to read it. Good luck on the contest, you have very beautiful work!
you have a great eye for fine details, I love the placemat, It was so lovely and made quite easily. This will be a perfect project for couples. You are very gifted, for doing such detailed work. I really enjoyed having the tutorial to follow, this gives people not only an idea on which they could do for their venues, it also shows them how to create your wonderful creations to enhance the look of the venue as well. Good luck to you I really hope you win!!
Very pretty!! Hard to choose a winner !
What a wonderful place setting/menu you’ve created. Very romantic. Thanks for sharing the details and good luck with the contest.
The place card trimmed in gold and embellished with the rose are awesome! Makes me want to marry again, but after 51 yrs. with the same husband I best stay put.
Oh my goodness! haha You are too funny. 51 years that is amazing and great to hear! Hey you could always have a renewal of your vows?! Any reason to celebrate is a good reason, especially after 51 years!
Stunning! Best of luck in the contest!
*Fingers are crossed* Thank you so much!
Very pretty crafting ideas. Thanks.
Lovely place setting. The placemat is gorgeous. Very pretty.
Love the roses & elegance you incorporate!
The font on the menu is a fantastic design choice, but I really love the 3D border sticker. That brings the menu together for me and makes it look professional.
I do! I love these projects. Thank you for this fun chance to win!
It was hard choosing because I liked them all.
This was a hard decision to vote, all these were great ideas! Good luck to all.
Love it. Simple but elegant.
I love the placemat and roses are my favorite.
I really like the placemat too —– how did you do that?
Your going to laugh. All I did was take two pieces of Anna Griffin card stock put them together and then took 4 strips of Anna Griffin borders and taped them underneath the card stock. And Voila! a pretty and super easy place mat.
I love the rose the most. It truly looks like one. Rose ‘s are my favorite flower. And my daughter’s middle name is rose. So was my mother in laws .its the color to